
Docker has been on my radar for quite some years now, but, I have to admit, as a C developer, I never really cared about it. I run Arch Linux on my computer, so everything I ever needed was packaged, save for a few exceptions where I could just whip up a custom PKGBUILD and install the resulting package. If I needed another OS, I used a VM.
But recently, I forced myself to try that container thingy (much like you'd try again some food you wrongly discarded as uninteresting when you were a child), and I found that I could find a few use cases for it, related to Varnish, of course. This post is a report of my exploration, so, don't expect too much new stuff, but since it's also focused on running Varnish inside a container, so there a few specific tricks and questions to be aware of.
Before we begin, know that the whole code from this blog is collected here: https://github.com/gquintard/docker-howto.
Warning: No unicorn sold here
If you're new to Docker, be aware that this post won't cover all your needs. Docker is a very nice solution, but it's a just tool, and what you make of it and how is more important than what it is, same as git, for example. However, we'll explore two ways (out of ten bazillions) to build a Varnish+Hitch+Agent image to cache HTTP/HTTPS content and be able to pilot it using a REST API.
Docker is an easy way to produce versioned, all-included system images, but not much more. You'll still need to care for your machines, configure them and monitor them. In addition, contrary to a VM that has its own kernel, containers use the host's so you can't really tune the TCP stack (something we do routinely for high-performance servers) directly from the container for example.
But that can be covered in a later blog post. Let's get you up and running first.
First there was nothing the Dockerfile
To build an image, we have to feed Docker a Dockerfile, which is a text file that will explain the various steps required to create said image. It will involve (most of the time) choosing a base image, then modifying it according to our needs. Here we'll use a Centos image because it's a solid, widespread distribution and because we have all the right packages available for it via PackageCloud.
One important thing to know is that each action/line of the Dockerfile will generate an intermediary image or "layer", that is saved (as a delta, to save space). This avoids rebuilding the full thing over and over, if Docker can find a previous layer matching exactly your image. So, for this to be useful, we'll tend to put the larger, longer, less-likely-to-change operation towards the top of the file, and the quicker and less dramatic ones near the end.
Here's the Dockerfile I came up with:
FROM centos:7

COPY bundle/ /

RUN yum install -y epel-release
RUN yum install -y varnish varnish-agent hitch
but by default, that won't be useful to us in this blog.
COPY conf/ /

RUN /root/hitch_gen_conf.sh /etc/hitch/hitch.conf /etc/hitch/pems

EXPOSE 80
EXPOSE 443
EXPOSE 6085

CMD /root/varnish-suite.sh
Easy enough, we ask for the Centos image tagged with version 7. The first time we ask for it, Docker will dutifully request it from the docker hub, and of course, you can choose a different distribution and/or version.
Then there is that bundle/directory that we copy to import two helper scripts (we'll use them very soon) and more importantly for now, the PackageCloud repo file to know where to find our packages. The bundle/tree looks like this:
bundle/
├── etc/
│   └── yum.repos.d/
│       └── varnish.repo
└── root/
    ├── hitch_gen_conf.sh
    └── varnish-suite.sh
Once it's in there, we can use yum to first install the epel repository, then the trio of programs we'll use.
The configuration
After the yum commands, we progress to the next lines:
COPY conf/ /

RUN /root/hitch_gen_conf.sh /etc/hitch/hitch.conf /etc/hitch/pems
Next, we copy the configuration tree. In this setup, the whole configuration tree is copied to the destination image. This allows you to edit the files, re-build and be ready to go. The minimal tree looks like:
conf/
└── etc/
    ├── hitch/
    │   ├── hitch.conf
    │   ├── pems/
    │   └── testcert.pem
    └── varnish/
        ├── agent_secret
        └── default.vcl
Note: this explains why conf/ and bundle/ are two different trees, copied at different stages. We want to profit from Docker's cache, and re-downloading the same packages every time we update the configuration (i.e. frequently) is not nice.
Then we run hitch_gen_conf.sh. Most of the configuration for Hitch will be specified in hitch.conf, and will be about specifying the right certificates so that your container can authenticate itself as a legitimate server. For each certificate effectively copied to the configuration tree, this also involves adding a few lines like:
pem-file = "/etc/hitch/pems/certificate1"
pem-file = "/etc/hitch/pems/certificate2"
...
And since I'm super lazy, I thought we could simply generate the configuration based on what we find in /etc/hitch/pems. To activate it, just place your pem files in conf/etc/hitch/pems and uncomment the "" line in hitch.conf, and you'll be good to go.
Obviously, conf/ also contains the vcl file(s) you want to bring along, but there's nothing out of the ordinary here.
Unnecessary exposition
There are also three lines that maybe a bit cryptic, but you probably have an idea of what they are about:
EXPOSE 80
EXPOSE 443
EXPOSE 6085
80 and 443 are familiar as the HTTP and HTTPS ports, and the more experienced Varnish users may have recognized 6085 as the varnish-agent port.
But what does the EXPOSE instruction do? Short answer: for us, here, nothing. They simply inform Docker that there are services listening on these ports, that's notably useful when using the -P switch for "docker run" as you'll see below.
The driver
Lastly, we tell Docker what command the container should run by default, and here we finally use varnish-suite.sh:
CMD /root/varnish-suite.shOne thing to grasp about Docker is that a container usually runs only one command, and while you can attach another command to a running container, everything should be started from one single command. So, we abide and create a little script that starts all three daemons and then wait forever (note the classic tail trick at the end) to keep the container running.
You can have a look at the script here; it may seem a bit convoluted, but that's so we can reuse it later.
Building and running
If you don't want to bother with cloning the repositoryexplicitly, building the image is as easy as:
docker build -t varnish-img git@github.com:gquintard/docker-howto.gitOr you can get the repository and build for local data, which will allow you to change the files in the conf/ repository before actually building:
git clone git@github.com:gquintard/docker-howto.git
cd docker-howto
docker build -t varnish-img .
Now, running it is a bit more complicated, but just barely.
Because the container is going to be trapped inside its own little operating bubble, we need to create a few contact points. Namely, we need to have Varnish, its agent, and Hitch reachable from the outside world.
To do this we are simply going to route three ports from the hosts (1080, 1443 and 1085) to ones inside the container (80, 443 and 6085) using the -p switch of "docker run":
- -p 1080:80 for varnish
- -p 1443:443 for hitch
- -p 1085:6085 for the agent
Note: if you want to just redirect the ports to the container without changing them (-p 80:80 ...), you can just use the -P switch that means "expose all" and will use the EXPOSE lines from the Dockerfile to do so.
Also, to follow these guidelines, we'll want the /var/lib/varnish directory to be mounted as tmpfs. No reason to ruin performance just because we are in a container, that is done using the --tmpfs switch. The fun thing is that by default, that won't work! (I do have my own definition of "fun"). The /var/lib/varnish/ folder is used to store the compiled VCLs, and they need exec permission, so we need to add that.
Putting all this together, we run:
docker run -it -p 1085:6085 -p 1080:80 -p 1443:443 --tmpfs /var/lib/varnish:exec varnish-img 
Fig.1 All services running in one container
If you try to "curl localhost:1080", Varnish should reply with a 503, a sign that it's running but hasn't got access to a backend (duh, we never configured one!).
Using "curl https://localhost:1443 -k" should yield a similar result, sign that Hitch is running too, and you can also check that the agent is up using "curl http://foo:bar@localhost:1085 -k" (authentication is handled via the /etc/varnish/agent_secret file).
A word about the configuration
In this post, I made the choice to embed the configuration directly into the image, and people may be outraged because "you need to separate data and code", but really, image deltas are cheap, both in time and space.
If you really want to externalize configuration, you can reuse the "-v" switch to mount the directories to their correct place, for example:
docker run \
    -p 1085:6085 \
    -p 1080:80 \
    -p 1443:443 \
    --tmpfs /var/lib/varnish:exec \
    -v conf/etc/varnish:/etc/varnish \
    -v conf/etc/hitch:/etc/hitch \
    varnish-img
The advantage is that you can change the configuration on your host machine and reload Varnish without needing to re-build and re-run the container. It works beautifully, but now you need to pull your configuration from *somewhere* and manage dependencies between software versions and configuration versions and... well, that's also a topic for another post.
Now what?
Tons of stuff! You now have an active container and we can see how we can interact with it. For example, how do we look at the varnishlogs?
First thing to do is to identify our container, which can be done using "docker ps":
CONTAINER ID        IMAGE               COMMAND                  CREATED             STATUS              PORTS                                                                 NAMES
ea45b7a78e52        varnish-img         "/bin/sh -c /root/..."   10 seconds ago      Up 10 seconds       0.0.0.0:1080->80/tcp, 0.0.0.0:1443->443/tcp, 0.0.0.0:1085->6085/tcp   amazing_tesla
You can see here that it's running varnish-suite.sh, on the "full-install" container, and since I didn't name that container, Docker baptized it "amazing_tesla"; I probably wouldn't have done better.
Note: This means you can run multiple containers using the same image, but you'll need to name them differently (or let Docker do it automatically) and make sure you don't reuse the same host ports.
To execute varnishlog on it, I simply need to run:
docker exec -it amazing_tesla varnishlog -dThat's pretty nice as you can check the actual logs without leaving the comfort of your own machine; it's very much the equivalent of "ssh user@host command". And if you really want to "log" into the container, you can run bash directly and explore from there:
docker exec -it amazing_tesla bashNotably, try running "ps aux" and see how clean the output is because of the process isolation:
USER PID %CPU %MEM VSZ RSS TTY STAT START TIME COMMAND
root 1 0.0 0.0 11640 2584 pts/0 Ss+ 13:23 0:00 /bin/sh -c /root/varnish-suite.sh
varnish 16 0.0 0.0 122796 3332 ? Ss 13:23 0:00 varnishd -a :80 -a :8443,PROXY -f /etc/varnish/default.vcl -s malloc,256MB
root 19 0.0 0.0 46432 2816 ? Ss 13:23 0:00 hitch --config=/etc/hitch/hitch.conf --daemon --backend=[127.0.0.1]:8443
hitch 21 0.0 0.0 46432 3320 ? S 13:23 0:00 hitch --config=/etc/hitch/hitch.conf --daemon --backend=[127.0.0.1]:8443
hitch 22 0.0 0.0 46432 3324 ? S 13:23 0:00 hitch --config=/etc/hitch/hitch.conf --daemon --backend=[127.0.0.1]:8443
hitch 23 0.0 0.0 46432 3328 ? S 13:23 0:00 hitch --config=/etc/hitch/hitch.conf --daemon --backend=[127.0.0.1]:8443
hitch 24 0.0 0.0 46432 1716 ? S 13:23 0:00 hitch --config=/etc/hitch/hitch.conf --daemon --backend=[127.0.0.1]:8443
hitch 25 0.0 0.0 46304 1716 ? S 13:23 0:00 hitch --config=/etc/hitch/hitch.conf --daemon --backend=[127.0.0.1]:8443
varnish 26 0.0 1.0 318916 86760 ? Sl 13:23 0:00 varnishd -a :80 -a :8443,PROXY -f /etc/varnish/default.vcl -s malloc,256MB
varnish 244 0.0 0.0 503420 1856 ? Ssl 13:23 0:00 varnish-agent -K /etc/varnish/agent_secret
root 252 0.0 0.0 4352 660 pts/0 S+ 13:23 0:00 tail -f /dev/null
root 260 0.0 0.0 47448 3200 pts/1 Rs+ 13:28 0:00 ps aux
Doing things the "right" way
We already have a working image, but everything is jammed together and that's not very "micro-service-y". Wouldn't it be neat if all three services could reside in their own container? Yes it would! More importantly, by running them on the same container, we blind ourselves to the errors/crashes. Because we run "tail" at the end, the container will terminate only if "tail" stops, even if Hitch and/or Varnish and/or varnish-agent are dead. The possibility of having a "zombie" container is not very satisfying.
Now, equating a service with a container sounds nice, but also tedious. If you are familiar with the Varnish architecture, you may have already realized that between the three programs there's quite some magic happenning:
- hitch must know what's Varnish's host, before it was easy: localhost. That won't hold true with Varnish on a different container. What will the Varnish IP be, anyway?
- varnish-agent must know where to find the SHM (containing logs, counters, the secret key and the administration port) that was in /var/lib/varnish/$HOST. But now the two programs won't be on the same host or filesystem.
- varnish-agent must also know both the secret key to the admin socket and the admin port. Both are located in the SHM, but if the port is retrieved from it, the agent will connect to localhost, so that won't work here.
So, that's quite a lot things to watch and synchronize! And as it is not my style to expose a problem without riding to the rescue like a grandiloquent white knight, I happen to have a solution.
"The" solution
Actually, it's really only one solution; a lot of smart people have had a look at the problem, and I'm just offering the default one. The name's docker-compose and it will allow you to write a yaml file that describes how to set up your system. Here's what we'll use:
version: '2'

services:
varnish:
image: "full-install"
ports:
- "1080:80"
environment:
- SINGLE=varnish
- VARNISH_OPTS=-n /var/lib/varnish -T :6082
volumes:
- workdir:/var/lib/varnish
hitch:
image: "full-install"
ports:
- "1443:443"
environment:
- SINGLE=hitch
- HITCH_OPTS=
agent:
image: "full-install"
ports:
- "1085:6085"
environment:
- SINGLE=agent
- AGENT_OPTS=-n /var/lib/varnish -T varnish:6082
- STAT_OPTS=-n /var/lib/varnish
volumes:
- workdir:/var/lib/varnish

volumes:
workdir:
driver: local
driver_opts:
type: tmpfs
device: tmpfs
As for the Dockerfile, there's not a lot going on, but I'd like to hammer a few points home before we call it a day post, notably the ones I may have forgotten in a few months and I'll need to read that article again to know why I did things this way.
- "version: 2" is just the version of the syntax of the file (yup, I had to look that up)
- volumes: workdir is super important, we both want Varnish to be writing in a tmpfs-mounted file, but we also want to shared it with the agent. Thus it's necessary to have the last block so that both can refer to it.
- For the agent and Varnish, we additionally specify the workdir and the admin port, but not the secret that will be retrieved from the SHM in the workdir.
- In the hitch block we override the backend with the host "varnish", it points directly to the varnish block above it. Upon creating the container, docker-compose will add an extra route automatically. That way we don't need Varnish's IP at all. That means that instead of using "127.0.0.7" as backend, Hitch will just use "varnish".
- The SINGLE variables allow varnish-suite.sh to be reused and to only run the selected program. Using some bash-fu, it also adds/removes the proper switch so as to start the program in the foreground (non-daemonized).
Easily enough, this is run using:
docker-compose -f compose.yaml up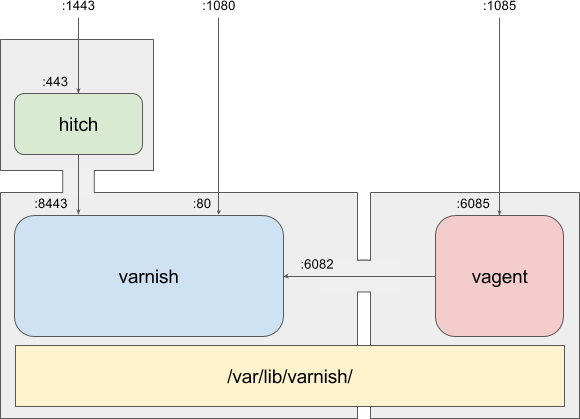
Fig.2 One service per container
And it can be tested exactly the same as the all-in-one solution since the ports are the exact same!
The end of the line
Well, not really, but I'm listening Sabaton's "The end of the line" at this precise moment, and it kind of seemed fitting. In truth, we have only just started the Docker journey. As said at the beginning of the article, this is just a tool, and there are tons of ways to wield it, bad and wrong obviously, but importantly, more or less fitting to your workflow. Sadly, there's no universal answer, but after all, that's what makes engineering such systems fun, isn't it?
As you have seen, we've taken quite a few shortcuts here:
- we didn't configure any backend for Varnish in the VCL.
- neither did we clean the image in the Dockerfile to reduce its size.
- the compose file is also devoid of backend.
- the logging has been left out altogether.
I'm going to take the easy way out and leave these as an exercise to you, readers, but if you'd like to discuss the way things were done in this article, hit me up on Twitter or in the comments!

