Varnish Cache will try to write as much of the response headers and body to the client as fast as it can accept it. We do this using writev() to let the kernel handle this for us, instead of tying up a worker thread for it.
This is great for small responses, but perhaps not so great when the server has multiple 10-gigabit connections and the client is on DSL. The reply will fill the buffers on the first bandwidth constrained router on the way, leading to buffer overruns and later dropped packets. TCP notices, reduces the congestion window, and it slowly stabilizes and flows smoothly.
At this point we've put a lot of bytes on the wire that are dropped, and that has no use. In addition we are provoking a short TCP connection stall that may not be necessary.
To fix this the great minds of the internet thought long and hard, and figured out some new network schedulers to avoid what we now call bufferbloat. It isn't strictly related to our problem, but their work is awesome engineering, which we can use for our needs.
vmod-tcp came to life a while ago, mostly for the sake of curiosity and experimentation. It isn't very often you want to change the congestion control algorithm in use on a TCP connection (yes, there is more than one, and no, this stuff isn't magic), but if you wanted to you could. One of the other things it can do is set a socket option for socket pacing, which is a fancy way of saying transfer rate limiting or traffic shaping. Pacing limits the outgoing data rate inside the kernel itself, which means the application doesn’t have to implement it. Excellent, less code to write and debug.
Here is a wireshark transfer graph of wget downloading a cached 20 MB file from Varnish Cache.

It starts out with a healthy 25MB/s and slurps down the file within a second. If you look closely, you can see slow start influencing it even when we have the initial window allowing 10 segments.
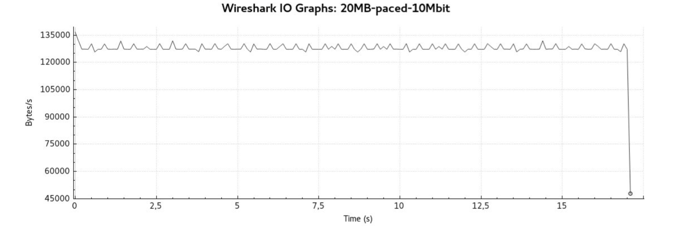
After enabling socket pacing, we see the file transfer is shaped to a much slower rate of 10Mbit/s or about 1.25MB/s:

The transfer now takes quite a bit longer, but completes successfully after 19 seconds. (I ran these in sequence, which is probably the reason for no gradual ramp-up in the last case.)
From a Varnish perspective the downside is that you tie up a worker a while longer. The varnishlog accounting tells us Varnish spent 490us processing before handing the kernel data for about 17 seconds:
- Timestamp Process: 1468414685.403098 0.000490 0.000009
- Timestamp Resp: 1468414702.456328 17.053721 17.053230
Naturally we’ll need a whole lot more worker threads now that they spend a long time delivering, so you should increase thread_pool_max if you run this in production.
Setting it up
Setting up socket pacing on your Varnish consists of three steps:
- Changing the network scheduler
- Getting the VMOD
- Changing your VCL
Here is how:
New network scheduler
Before this takes effect, you need to change the network queuing policy on the network interface where internet traffic passes. The fq scheduler is what you need; examples below are from a Debian testing machine with a gigabit interface on eth0.
Show the current queuing policy:
root@stretch:~# tc qdisc show dev eth0
qdisc mq 0: root
qdisc pfifo_fast 0: parent :1 bands 3 priomap  1 2 2 2 1 2 0 0 1 1 1 1 1 1 1 1
[..]
Change it to fq:
root@stretch:~# tc qdisc add dev eth0 root handle 1: fq
Now we have:
root@stretch:~# tc qdisc show dev eth0
qdisc fq 1: root refcnt 9 limit 10000p flow_limit 100p buckets 1024 orphan_mask
1023 quantum 3028 initial_quantum 15140 refill_delay 40.0ms
To persist this across reboots you can add the /sbin/tc command to /etc/rc.local.
If you use Hitch in front of Varnish for TLS, you also need to add the fq scheduler on the lo interface if they use that for communication.
Getting the VMOD
On Debian stretch this is terribly convenient, as vmod-tcp is in varnish-modules, which is already available in apt:
root@stretch:~# apt-get install varnish-modules
[..]
Setting up varnish-modules (0.9.0-3) ...
On other systems you’ll have to build it from source, which can be found on our open source distribution site: https://download.varnish-software.com/varnish-modules/
Detailed installation instructions are inside the .tar.gz file you’ll find there.
Changing VCL
In VCL the needed VCL is short and sweet. Here is a complete example for some context:
vcl 4.0;

import tcp;

backend default {
    .host = "192.0.2.11";
    .port = "8080";
}

sub vcl_recv {
    # Shape (pace) the data rate to avoid filling
    # router buffers for a single client.
    if (req.url ~ ".mp4$") {
        tcp.set_socket_pace(10000/8); # [KB/s], so this is 10Mbit/s.
    }
}
The important parts are importing tcp and running tcp.set_socket_pace() for the requests you want shaping to happen on. If nothing is set, responses are served at full speed.
Reload Varnish to get the new VCL running, and you’re done!
In closing
This pacing support was originally made for Varnish Cache Plus, which is a part of our Varnish Plus offering. We are an open source company and try to make our software open sourced whenever we can, so after about a year we put vmod-tcp into the varnish-modules collection and made it freely available. Varnish Plus is great for advanced Varnish tricks, like running with terabyte-sized storage or a replicated high availability setup.
Photo (c) 2015 Kevin Dooley used under Creative Commons license.


