
In this week's episode of 2-Minute Tech Tuesday, we're showing you how to run Varnish in the cloud on Microsoft Azure using the official Varnish Enterprise machine image.
If you've been paying close attention to the Two Minute Tech Tuesdays series, you will have noticed that the last couple of weeks we've featured cloud-related content.
Two weeks ago we talked about the principles and the basic concepts of running Varnish in the cloud. Last week, we showed you how to run it on AWS and this week, we’ll show you how to run Varnish in the cloud on Microsoft Azure.
How it works
- The installation procedure starts in the Microsoft Azure portal. Click Create and add a new virtual machine. Next, give it a name and choose a location.
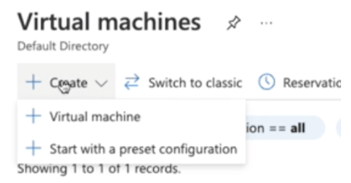
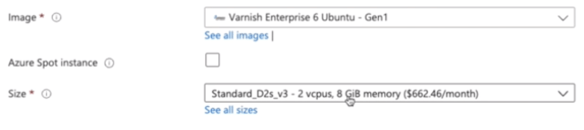
- Next go to the marketplace and select Varnish Enterprise. There is the option between an Ubuntu system and a Red Hat system.
- Choose the size of the machine; the standard one brings two GPUs and eight gigabytes of RAM.
- In terms of authentication, we're going to use SSH keys, and will generate new key pair.

- For the next steps involving disks, networking, management settings and other advanced settings, we can use the default values. However, specify a name tag to identify the virtual machine in the list of servers.
- And finally, it's a matter of reviewing all parameters, creating the server and downloading the private key to access the server via SSH.
- Once the creation of the server is finished, go to the server details page, copy the public IP address and paste it in a browser to see the Varnish landing page. This contains a link to a detailed instruction guide.

- Before we can access the server via SSH, we need to set the permissions right on the key that we just downloaded, and once that’s happened use the SSH command, use the key and log in to the server. The first thing we'll do is open the /etc/varnish/default.vcl file with an editor to remove the placeholder code, and to modify the host and port properties of our backend definition. Use the IP address and the port number of the web server so that Varnish knows where to proxy to.
- Change the default IP address and the port number to the web server so that Varnish knows where to proxy to.
# Default backend definition. Set this to point to your content server.
backend default {
.host = “127.0.0.1”;
.port = “8080”;
} - Then it's a matter of editing a couple of runtime parameters if necessary, such as upgrading the size of the cache from 256 megabytes to 2 gigabytes, and finalize this by calling systemctl restart Varnish, to restart the Varnish service. Refreshing the browser, instead of the landing page there is the actual content coming from the web server.
If you're looking for inspiration, why not go to the Varnish Developer Portal? We have tutorials and sample VCL that works for most websites and you will find specialized templates for things like WordPress, Drupal and Magento there as well.


