
In a previous blog post, we explained the difference between the loading speed of a page and the perceived loading speed in the browser.
As soon as your browser needs to load related resources like CSS files, Javascript files, web fonts and images, the perceived loading speed can decrease.
%20(2).gif?width=704&name=WW%20Email%20Signature%20(1200%20%C3%97%20200%20px)%20(2).gif)
Although the individual resources can be fast, the browser may delay the loading of some of them, which is called render-blocking. The browser also needs some time to “paint” the content in the viewport of the browser.
In the previous blog post about Core Web Vitals, I referred to the various metrics that help you understand the perceived loading speed of a website. In this blog post, I’ll explain how to improve your Core Web Vitals.
Our goals are pretty straightforward:
- Improve the time to first byte of our web resources
- Reduce the time it takes to generate the output of web pages
- Reduce the size of pages, images and static assets over the wire
- Eliminate render-blocking resources
We'll accomplish this in 5 steps:
- Step 1: Enable Varnish caching
- Step 2: Enable compression
- Step 3: Convert images to WebP
- Step 4: Defer blocking Javascript
- Step 5: Inlining specific CSS and SVG
The role of Varnish
Varnish is obviously an important tool to improve our website’s performance. By storing pages, images, CSS files, JavaScript files, web fonts, and other documents in the Varnish cache, we’re reducing the time it takes to load these resources and avoiding the webserver from getting overwhelmed.
This applies to anything that is loaded over the web, but it’s especially true for computationally heavy resources. These are usually dynamic pages that depend on a database or external services and they can block a web server connection while the content is assembled.
Varnish’s track record speaks for itself and while most Varnish use cases focus on reducing the load speed of individual pages, Varnish can also be used to modify those pages and improve the perceived loading time.
Thanks to Varnish Enterprise’s xbody VMOD, Varnish is capable of performing find and replace actions on the response body. This means Varnish can modify HTML code and correct poorly performing pages.
Varnish Enterprise’s image VMOD can convert JPEG and PNG images to WebP on-the-fly. This will reduce the size of the images without impacting the quality too much.
This means Varnish can go beyond the basics of web caching and make decisions “on the edge” that will benefit performance, both in absolute and in perceived terms.
An important side note is that modifying HTML code to improve browser loading is something that in most cases will be done in the source code of the application. However, doing it in Varnish is a viable solution when you don’t have access to the HTML code or if you don’t have the skillset to optimize your HTML code.
Inspired by the demo from our Core Web Vitals webinar
Last week, we organized a webinar about improving Core Web Vitals. In this webinar, we covered the basic concepts but quickly transitioned to a live demo.
The demo website was built to perform poorly and had some distinct features from a web performance point of view:
- The time to first byte for each resource was deliberately increased
- The origin web server did not serve compressed responses
- There were JavaScript files that were loaded in the head section of the HTML
- There were two CSS files, one of which only had 10 lines of code
- The logo of the website was a small SVG file without any height or width properties
- There was a 7 MB background image that took ages to load
Pretty much a recipe for disaster. This also shows in the network breakdown of the browser’s developer tools:
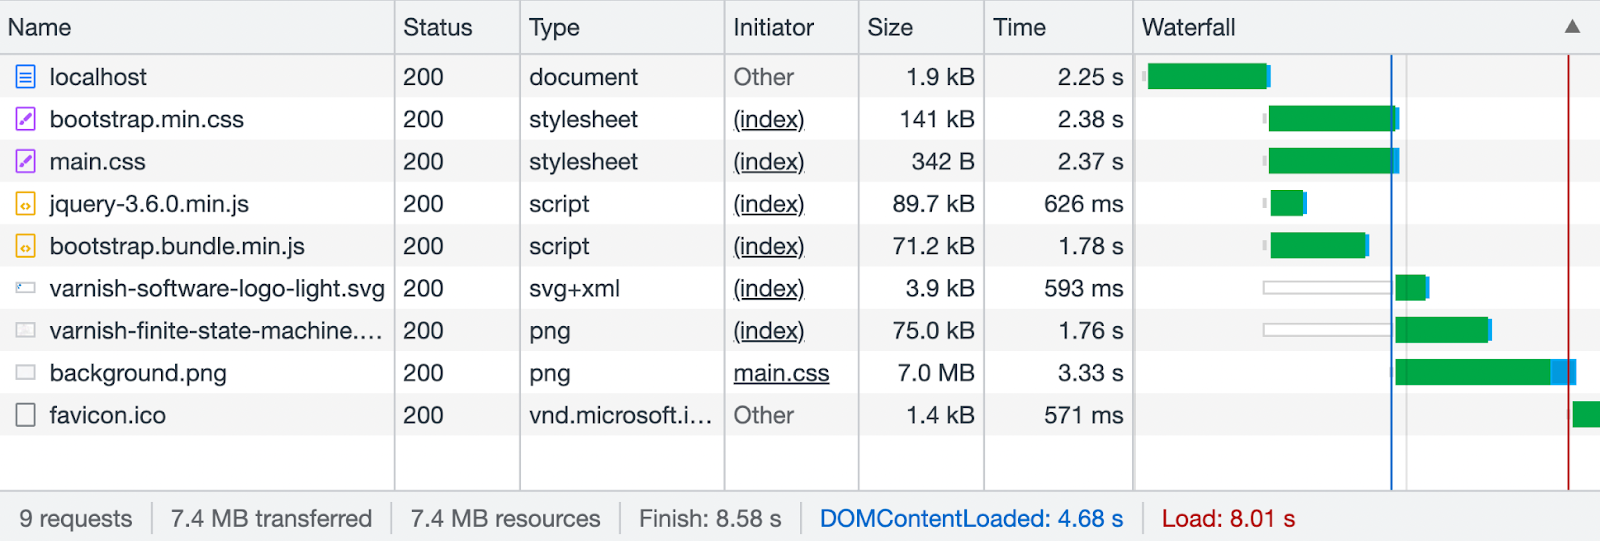
It takes more than eight seconds to load the entire page in the browser, whereas the HTML page took only two seconds to load. Don’t get me wrong: two seconds is still quite slow.
The waterfall diagram clearly shows that the CSS and JavaScript cause render-blocking which delays the loading of the images.
And in case you missed it: 7.4 MB is transferred, which is way too much.
When we run a Lighthouse test, the overall performance is measured at only 51%.
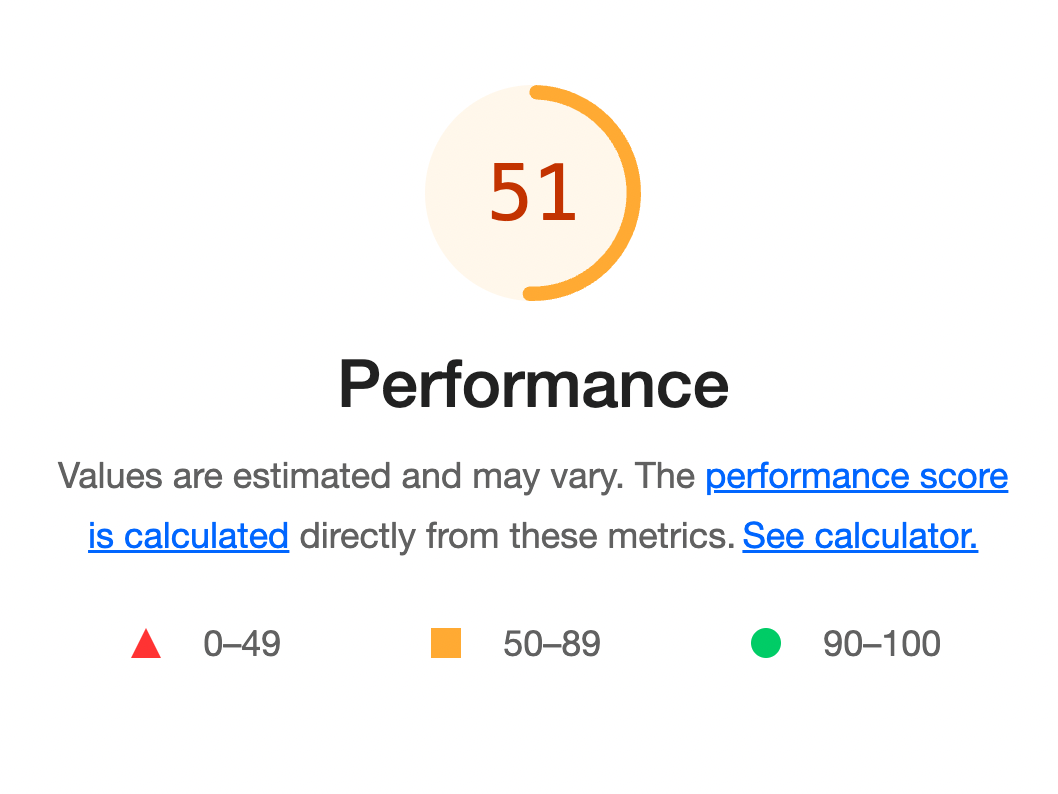
This number is composed of various performance metrics. Here’s the breakdown of the various metrics:
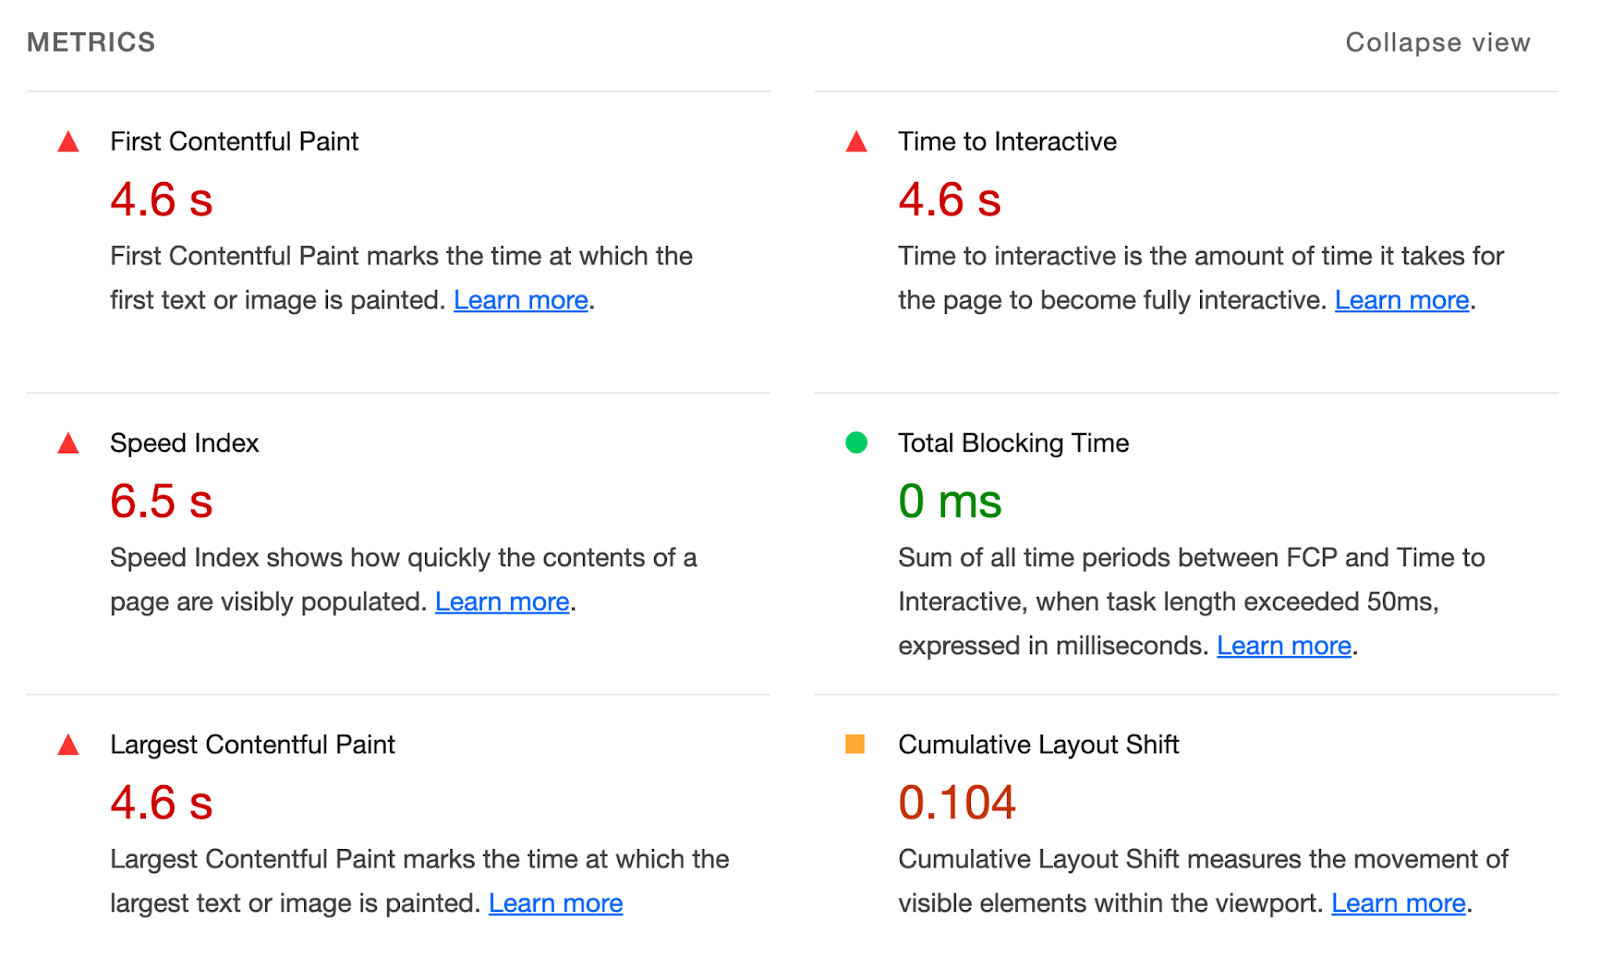
Because the resources are so slow to load, the time to first byte will be high. Because there are blocking resources both the First Contentful Paint and Largest Contentful Paint are performing poorly.
The 4.6 seconds is the sum of the loading time of the page itself (2.25 seconds) and the time it takes to load the slowest CSS and JavaScript resources (2.38 seconds). The 4.6 seconds also represents the time it takes for the website to become interactive.
Although the CSS and JavaScript files cause render-blocking, it does not increase the Total Blocking Time, because there is no time measured between First Contentful Paint and the Time to Interactive.
Because the logo of the website doesn’t contain any height and width properties, the browser cannot anticipate the size of the image at loading time. This causes some layout shifting to take place.
Time to optimize.
Step 1: Enable Varnish caching
First things first: by putting a Varnish server in front of the web server, we can reduce the loading times of the individual resources.
By reducing the time to first byte, we also improve the First Contentful Paint, the Largest Contentful Paint and the Time to Interactive.
After enabling Varnish caching, the loading times of the website are dramatically reduced:
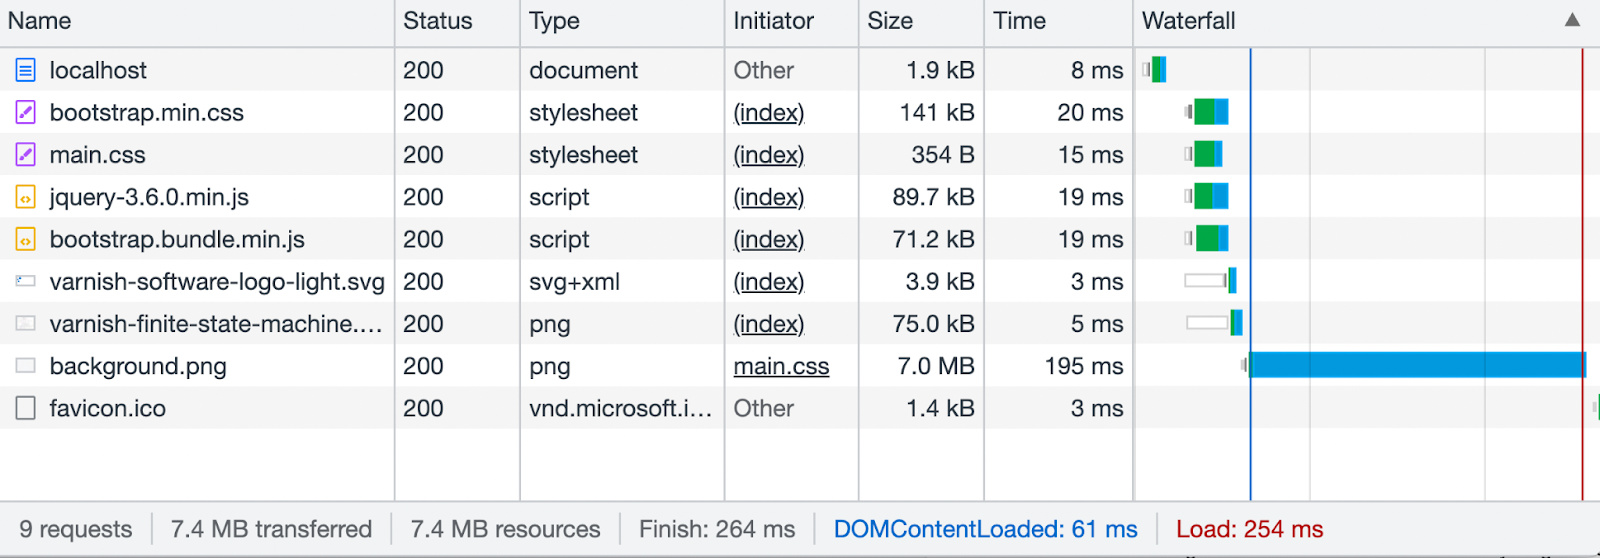
The web page itself only takes eight milliseconds to load, but because there are several dependencies that need to be loaded and because of the render-blocking, the total loading time is 264 milliseconds. This is great and has a positive impact on our Lighthouse metrics:
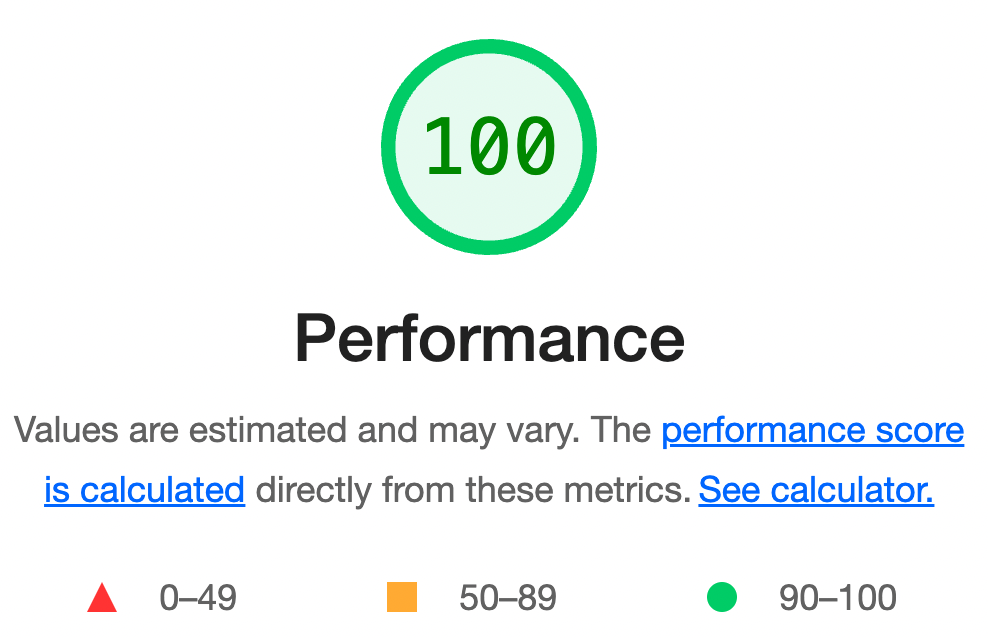
Just by adding Varnish, we received a perfect score. However, there is still work to be done. Lighthouse presents some call-to-action that can further improve the performance of the website:

Step 2: Enable compression
Lighthouse indicates that text compression can reduce the amount of bytes being sent over the wire. This only applies to textual data.
Varnish supports Gzip compression out of the box and if the web server sends Gzip encoded content to Varnish, Varnish will cache the compressed version.
But if the web server sends uncompressed responses, Varnish can still use Gzip compression to reduce the size of the response over the wire. This involves writing some VCL code.
sub vcl_backend_response {
   if(beresp.http.Content-Type ~ "^(text|application)/" ||
     beresp.http.Content-Type == "image/svg+xml") {
       set beresp.ttl = 1d;
       set beresp.http.Cache-Control = "public, max-age=31536000";
       set beresp.do_gzip = true;
   }
}
This piece of VCL code will enable Gzip compression on responses that have a textual Content-Type response header. These are content types that start with text or application. This also applies to SVG images that are vector images that are presented in XML. This means the image/svg+xml content type can also be compressed.
The by setting beresp.do_gzip to true Varnish will store uncompressed textual responses as gzip compressed data in the cache.
This VCL snippet also increases the time to live of the cached object to a full day. A custom Cache-Control header is returned to the client that requests the object to be cached in the browser for a year.
Although the total transmitted payload over the wire has reduced with more than 200 KB, the total payload is still more than 7 MB, which is way too much:

Step 3: Convert images to WebP
Reducing the size of the 2 PNG images and especially the background image has now become a priority. Transferring 7 MB of data to load a single page is just not acceptable.
Although the images could have been optimized on the origin side, it is now our job to reduce the size of these images “on the edge”.
Thanks to Varnish Enterprise’s image VMOD, we can convert regular JPEG and PNG images into WebP images. These are a lot smaller in size and optimized for fast loading on the web.
Here’s the VCL code we need to convert these images:
vcl 4.1;

import image;
import headerplus;

sub vcl_backend_response {
   headerplus.init(beresp);
   if(beresp.http.Content-Type ~ "^image/") {
       set beresp.ttl = 1d;
       set beresp.http.Cache-Control = "public, max-age=31536000";

       if (beresp.http.content-type == "image/jpeg" ||
           beresp.http.content-type == "image/png") {
           if (bereq.http.Accept ~ "image/webp") {
               if(bereq.url ~ "^/static/background.png"){
                   image.webp(quality=70, resize_width=1920);
               } else {
                   image.webp(quality=80, resize_width=800);
               }
           }
           headerplus.attr_set("Vary", "Accept");
       }
   }
   headerplus.write();
}
We are again looking into the vcl_backend_response subroutine that is called when the origin server returns a response. In that subroutine we use two modules that are imported at the start of the VCL file. Besides the image VMOD, we’re also loading the headerplus VMOD. We’ll use the latter to modify the Vary response header in the process.
When the origin server responds, we intercept the response and again inspect the Content-Type response header. Instead of looking for textual content, we’re looking for images. Specifically responses with an image/jpeg or image/png content type.
If we intercept a response for these sorts of images, we check if the client announces support for WebP images. We can check this by inspecting the Accept request header. If this header contains the image/webp value, we can start converting the images to WebP.
We use the image.webp() function to convert the image and even without any arguments, this function will perform the conversion without resizing the image and with a quality level of 80%. However, in this example, we are resizing the images and reducing the quality level for the background image.
To avoid serving WebP images to clients that don’t support them, we add the Vary: Accept header to the response. This will create a cache variation for the original JPEG or PNG image and a variation for the WebP image.
This VCL snippet also increases the cached object’s TTL to a day and just like for static textual content, we return a Cache-Control header to the client that instructs the browser to cache these images for a year.
The impact of these image conversions is quite significant as you can see in the network breakdown below:
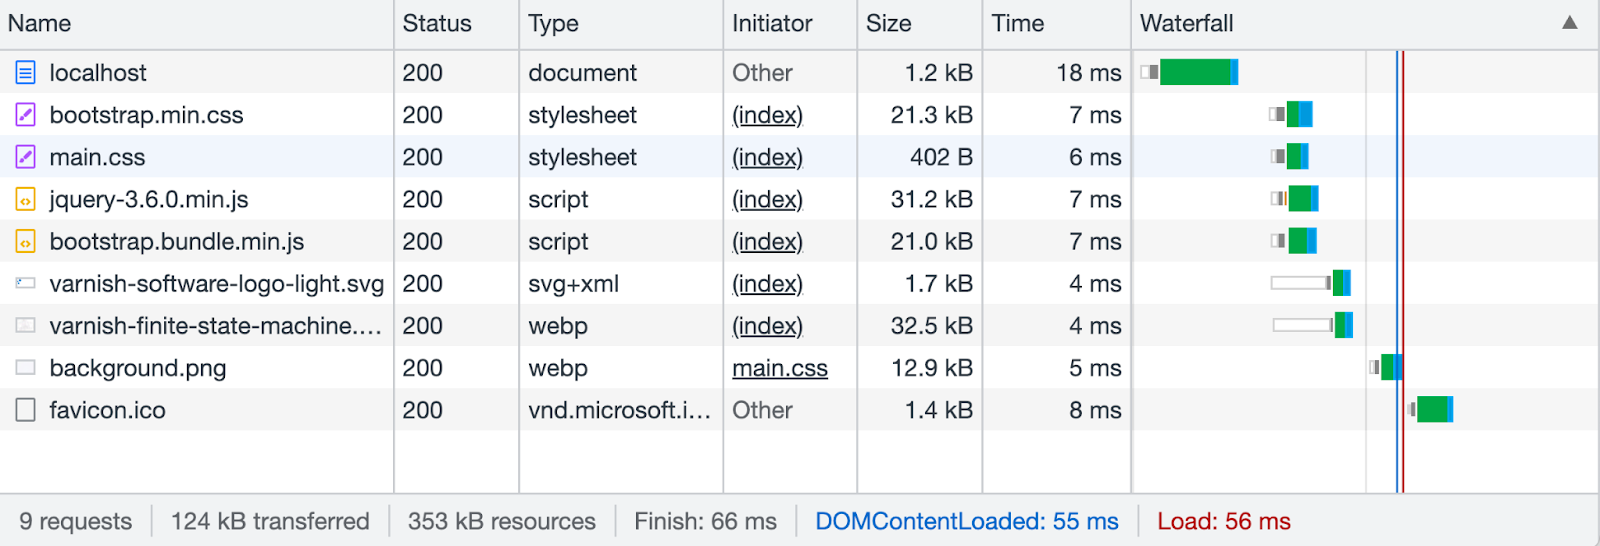
Our background image that was 7.4 MB—has now been converted to a 12.9 KB image. The total payload that was transferred has been reduced to a mere 124 KB.
Step 4: Defer blocking JavaScript
Although we have reduced the size of the payload dramatically, and although the loading times of the individual resources are very low thanks to Varnish caching, there are still some opportunities.
Lighthouse reports that there are still render-blocking resources being loaded:
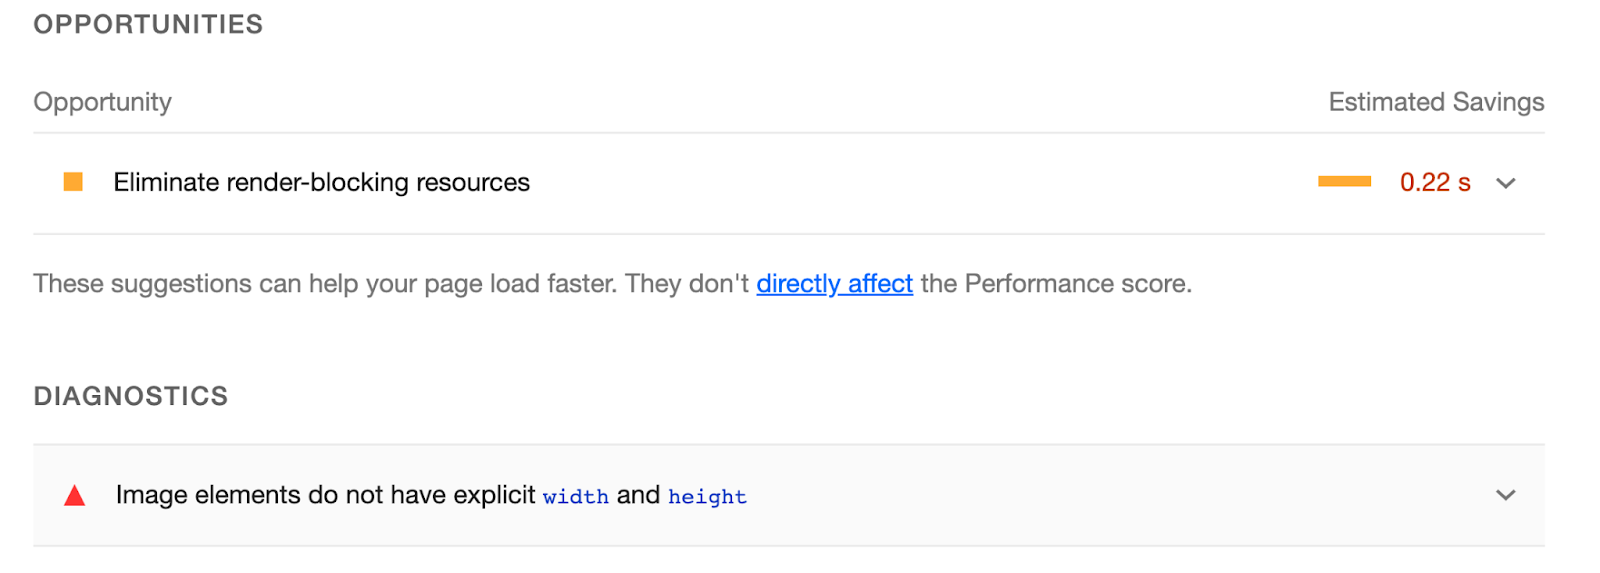
This is also visible in the network breakdown. Before the images can be loaded, the browser waits for the JavaScript to be loaded. These JavaScript files shouldn’t cause render blocking because the browser doesn’t depend on them to paint the initial content in the viewport of the browser.
We can in fact modify the <script> tags and add the defer keyword that instructs the browser to load the JavaScript resources in the background. While this is normally done in the source code of the application, we’ll be handling this in the VCL code.
Here’s the code you need to make it happen:
vcl 4.1;

import xbody;

sub vcl_backend_response {
   if(beresp.http.Content-Type ~ "^text/html") {
       set beresp.ttl = 1h;
       set beresp.http.Cache-Control = "public, max-age=3600";
       xbody.regsub({"<script src="},{"<script defer src="});
   }
}
This VCL code leverages the xbody VMOD that allows you to modify the response body before storing the object in the cache.
We again hook into vcl_backend_response where we match HTML content that is identified through a Content-Type response header that contains text/html.
The xbody.regsub() function performs a find and replace based on a regular expression pattern. In this case we’re looking for <script src and we replace these occurrences with <script defer src. This just adds the defer keyword to the script tag, which defers the loading of these resources in the browser.
At the same time, we’re also setting the cached object’s TTL to an hour, instead of relying on the TTL that was previously set to a full day for textual resources. This TTL is also reflected in the Cache-Control header that is sent to the client.
Step 5: Inlining specific CSS and SVG
If we look back at the Lighthouse report, there’s one improvement to be made:
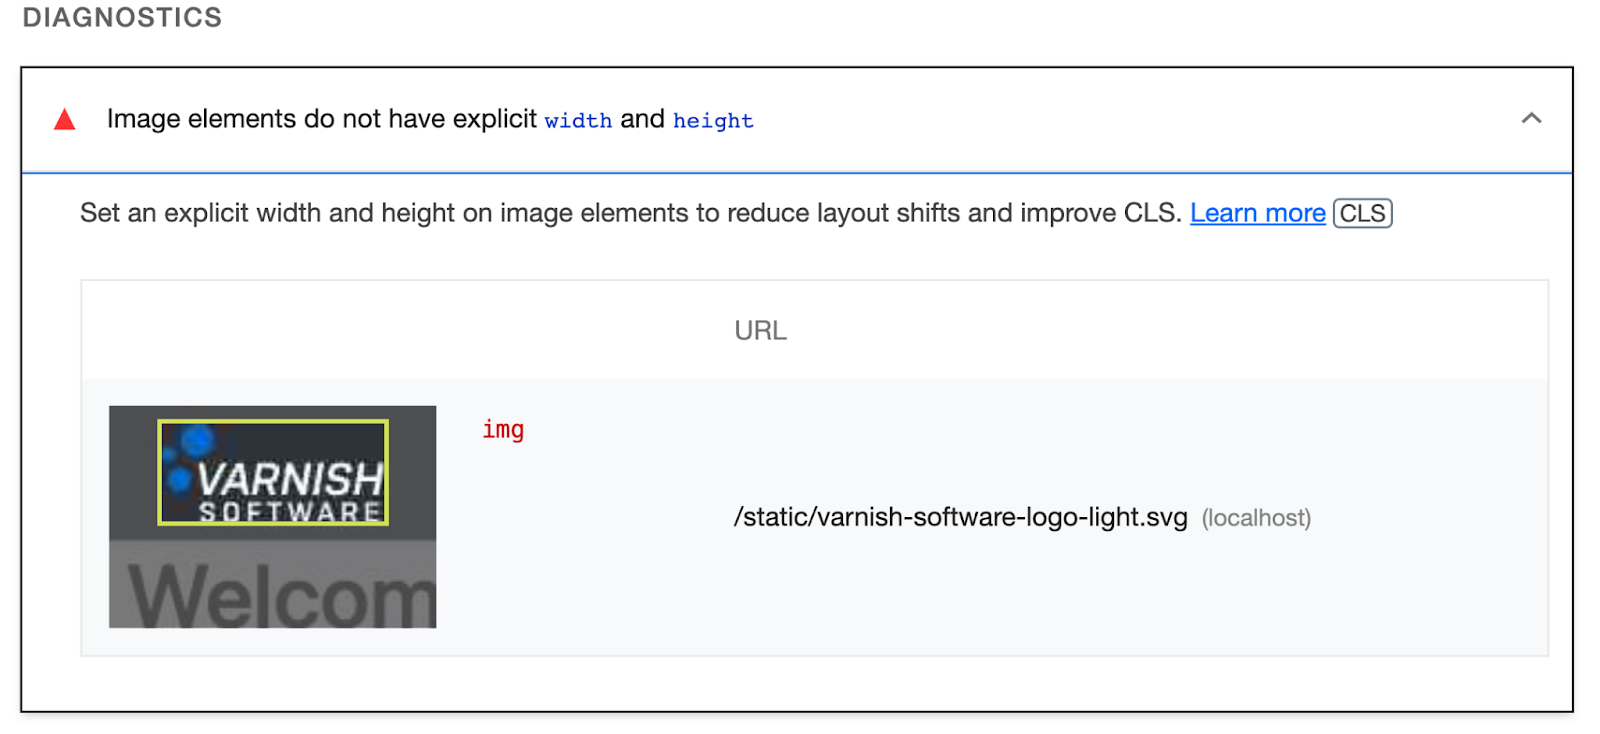
Apparently, there’s an image that doesn’t have width and height properties in the HTML code. When we look at the details, we can see that it’s our logo, which is an SVG file.
Instead of adding these attributes to the <img> HTML tag, we’ve opted to load the SVG file inline. Because the image is only 1.7 KB in size, we shouldn’t really waste an HTTP roundtrip on that image and instead load it inline.
SVG images are quite particular because their content is human-readable. The content is XML and can be embedded in your HTML file. Instead of loading the image through the <img src="/static/varnish-software-logo-light.svg" /> HTML tag, we can extract the URL from the src attribute and parse its XML content into the HTML code.
We’ll use Edge-Side Includes (ESI) for that, which would look like this for our SVG image:
<esi:include src="/static/varnish-software-logo-light.svg" />
This ESI tag can be parsed by Varnish, the URL it refers to can be triggered and the response can be stored in cache. Thanks to ESI the cached SVG file can be served from the cache and at the same time be presented as an inline image.
We can actually do the same thing with the <link rel="stylesheet" href="/static/main.css"> tag that loads a small CSS file. This file is less than a kilobyte in size and can also be loaded inline. The only difference is that the CSS content should be placed inside <style></style> tags.
Here’s the VCL code you can use to load both the SVG image and the CSS file as inline resources:
vcl 4.1;

import xbody;

sub vcl_backend_response {
   if(beresp.http.Content-Type ~ "^text/html") {
       xbody.regsub({"<link rel="stylesheet" href="/static/main.css">"},{"<style><esi:include src="/static/main.css" /></style>"});
       xbody.regsub({"<img .*src="/static/varnish-software-logo-light.svg" />"},{"<esi:include src="/static/varnish-software-logo-light.svg" />"});
       set beresp.do_esi = true;

   }
}
This code also leverages the xbody.regsub() function to replace content in the response body. The original content of the CSS stylesheet and the SVG image is replaced with ESI tags and by setting beresp.do_esi to true, we’re instructing Varnish to parse these placeholder tags and replace them with their corresponding cached content.
This removes two HTTP round trips and as a side effect, it takes away the image height and width problem that could affect the visual stability of our website.
Your mileage may vary
While the techniques we presented were incredibly effective, the demo website was designed to perform well with Varnish. The elements that caused the demo website to perform poorly were carefully constructed with the solution in mind.
In real-world applications, the challenges may be even bigger. Reducing the amount of round trips and reducing the size of some of the resources might not be as straightforward.
The key takeaway from this blog post and the webinar it is based on is not necessarily the VCL code itself. It’s more about awareness:
- Being aware that HTTP caching is a good way to reduce the loading time of pages and related web resources.
- Being aware that textual content should be compressed over the wire.
- Being aware that images should be optimized for the web.
- Being aware that the way you write your HTML code can affect the perceived loading time of your website.
If you can optimize images and the perceived loading speed of your website by making modifications in the source code of your website, please do it there.
If this is not an option, just remember that Varnish can do more than just accelerate the performance of individual resources: Varnish can also reduce the size of your content and modify the HTML code to improve the total loading time of your website.